
5 steps to agile with JIRA tools
Ekaterina Bazyleva, a1qa Manager, Scrum Master and SAFe Agilist talks about JIRA tools that help to plan, manage and track agile projects completion.
JIRA tools that can help the team to be agile doing any job
“Job” in this context refers to any task: preparation of test documentation, running regression tests or arranging training in a remote center of excellence in the course of software testing outsourcing.
This article will mainly be useful to those who:
- Manage multiple tasks on one or several projects;
- Want to offer Scrum or Kanban implementation with JIRA to the customer but don’t clearly understand how it will work;
- Already use JIRA Agile plugin or have a slight idea about it and want to go deeper.
Sounds like you? Then keep reading.
Every manager definitely has a Todo-list or lists with multiple work tasks. These tasks may belong to one project or to different projects. It’s not a rare case when the tasks are postponed and new ones are added. Managing these issues (I say “issue” here to move closer to the JIRA terminology) becomes a real headache. We regularly look through the list and promise ourselves to review it tomorrow or maybe next Monday. Familiar?
To be productive when solving the emerging tasks is one of the agile methodology principles. But don’t wait till your customer will ask to apply agile management methodology to complete the project. Take your current project and implement it using agile principles.
You’ll need to take five steps to become agile managing the project. They are the following.
STEP 1. Create and configure the agile board
Create a Board (Jira-Agile-Getting Started) to track the tasks (issues) completion.
This is the default view of the Agile Board:
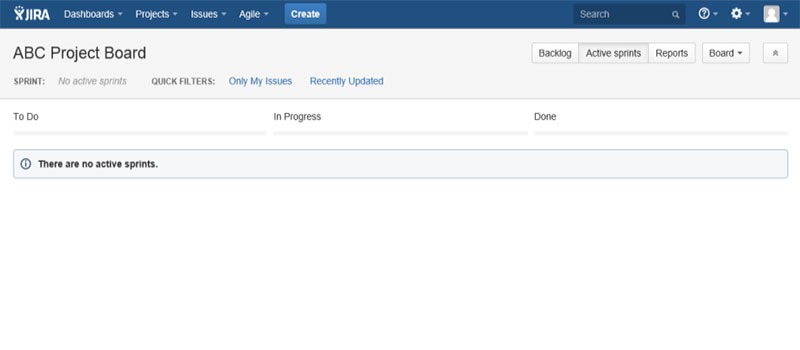
Now let’s configure it according to our needs.
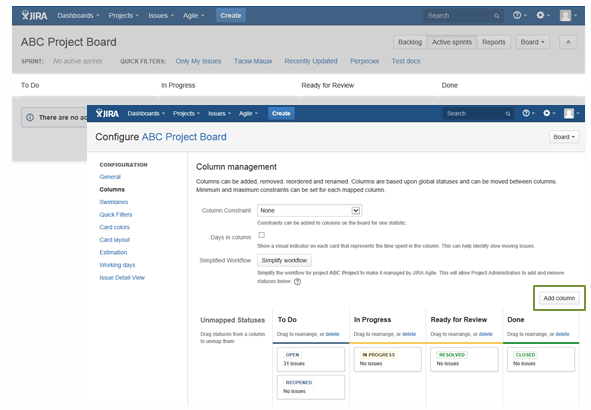
First let’s set up the columns. They will cover the issues lifecycle. You may choose any number of columns and name them as you wish. Preferably, the titles should map with the stages of the issues lifecycle (To Do, In Progress, Done).
You may also add different types of swimlanes to your board to categorize the issues. You may base the swimlanes on epics, assignee, queries or stories. The last option is especially comfortable if you work with sub-tasks. The swimlanes may also be based on your own filters or there may be no swimlanes at all.
Configure Quick Filters to (sorry the pun) quickly filter the issues appearing on the Agile Board. To add a new filter, enter its Name, JQL, and a Description.
Finally we’ll have to choose estimation to track work progress on the project. The most popular options are story points or original time estimates, which may be specified in minutes, hours, days or weeks.
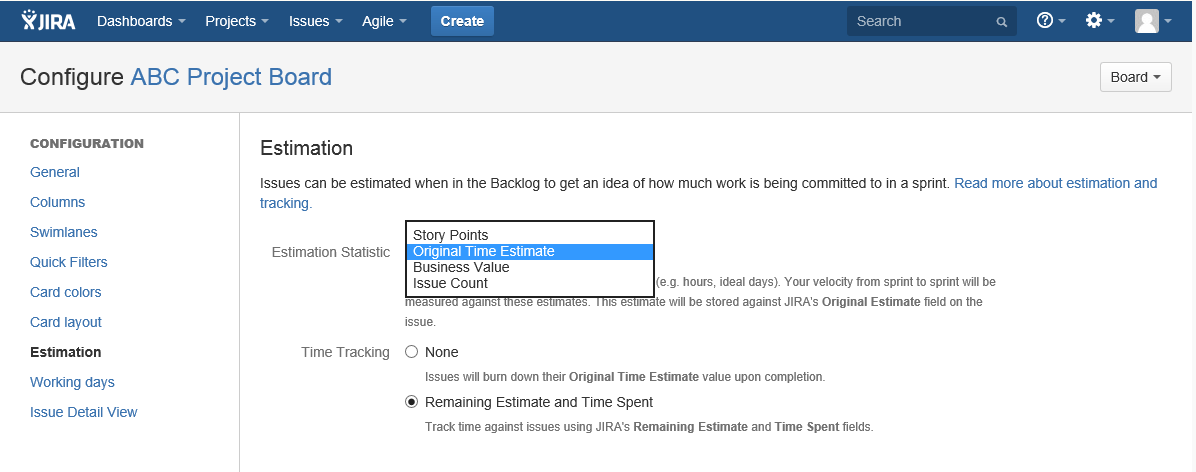
STEP 2. Prioritize the issues in the backlog
After you’ve created the Agile Board you’ll get access to the easy-to-use Backlog interface.
- Create Epics in every of your projects to cover the main types of activities, for example: processes optimization, test documentation upgrading, regression testing, etc.
- Set deadlines for every issue.
- The tasks from the todo-list will become user stories related to the main activities.
Now all your tasks are put in order in the Backlog. You can drag and drop issues to rank them, assign them and many more.
So now when the Agile Board and Backlog with all issues ranked are configured we go ahead to plan our first sprint.
STEP 3. Planning the sprint
A sprint is a short period (usually of two weeks) during which a team accomplishes the most important issues from the Backlog.
Let’s plan our first sprint.
- Choose the sprint duration. Will it last for a week, two weeks or any other period of time?
- Calculate the team’s capacity.
Capacity is the amount of issues that could and should be accomplished during the sprint. When calculating this number you should take into account the resources’ availability. Consider the fact that communication also takes time.
Example of the capacity calculation:
The team size is 2 full-time specialists.
The sprint duration is 2 weeks.
Total number of working hours is 160. You also know that one engineer will take training on web services testing (16-hour long). Communication will take about 20% of the working time.
Summing up, the capacity for sprint issues will be calculated as following: (160-16)*0,8=115,2 hours.
- Based on the team capacity, we allocate the issues from the Backlog to the sprint.
- Determine the sprint’s Start and End dates and press the Start button.
STEP 4. Completing the sprint
Now it’s time to accomplish the issues taken from the Backlog.
- As the first step of our tutorial we’ve created the Agile Board. Now it will enable us to track issues completion.
You may assign an issue to an engineer when creating the issue. If your team is self-organized, its members may choose the issues they’d like to fulfill. As soon as a user put an issue In Progress, he or she becomes the issue’s assignee.
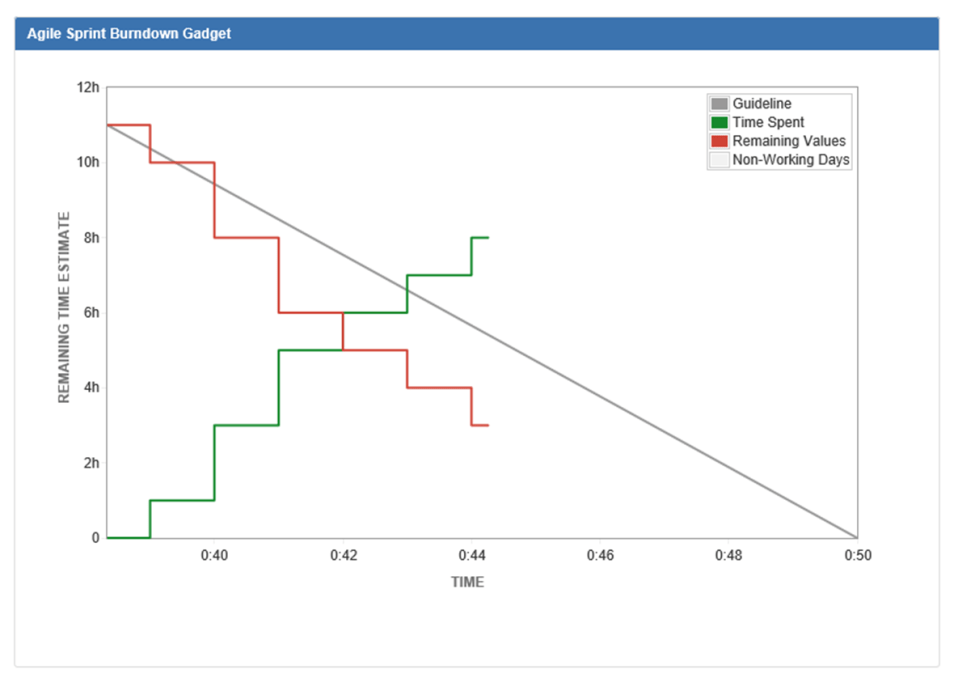
- If you are used to regularly logging time and tracking the total remaining time, use the Burndown Chart. It will show your progress and the likelihood to achieving the sprint’s goal on time.
The grey “Guideline” shows the ideal course of the sprint. The vertical axis indicates issues and the horizontal – time. On the image below the red line is the scope of opened issues, while the green one is the total time spent.
Let’s analyze a couple of Burndown Charts.
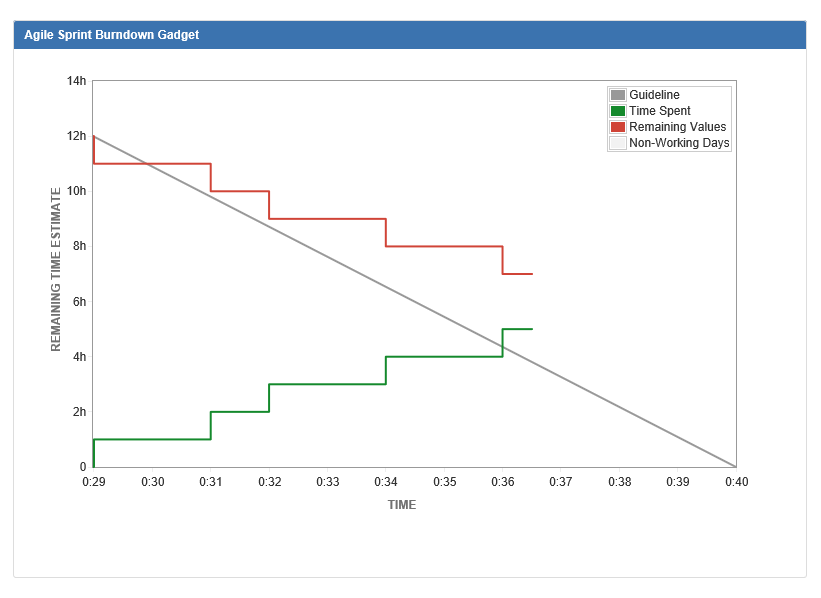
This team is facing some problems: the volume of the accomplished issues is smaller than it was planned. If they don’t make a push in the last days of the sprint, they’ll fail to complete all the issues on time.
On the contrary, these guys are moving ahead of schedule and have to look for some extra issues if the trend preserves.
STEP 5. Ending the sprint, conducting retrospective
Agile is not about boards, stories and sprints only. It’s about process optimization and bottlenecks detecting.
That’s why after pressing the End Sprint button, you’ll have to spend time and figure out why something (if anything) went wrong.
Pay attention to the following:
- When you complete a Sprint in JIRA Agile, you will be shown the Sprint Report. It will contain the list of issues that were planned for the sprint; those that were actually completed and were not.
- Analyze the Burndown Chart to figure out the moment when your team broke a schedule. Learn the reasons.
- If you chose major issues for Epics, for example “Run regression tests for the entire application at the minimal acceptance testing level”, the Report will show how much work is still to be done to accomplish this task.
- You may also estimate the team’s Velocity.
Velocity is a measure of how much of the backlog can be done by the team during the sprint. It can be calculated in story points, hours, issue count, or any numeric field of your choice.
These are the five steps to complete our Agile-project. Let’s numerate them again:
- Create and configure the Agile Board.
- Organize all issues in the Backlog.
- Plan the Sprint.
- Complete the Sprint.
- Conduct retrospective.
To end up with I’d say that JIRA may look scaring at first sight and too complicated to deal with. However, it will take you only a couple of days to learn its settings and customize it to your needs. Time invested to configure the Board will save you days of efforts.
In the next post read about some tips and tricks that can make you work with JIRA more productive.


